Download SQL Express 2014 or later from official Microsoft website. We recommend including the Management tools.
Use a 64 bit version if your computer is 64 bit
Google Microsoft SQL Express 2014. Be sure to choose the official Microsoft website for your download.
Create a new instance of the database.
View a YouTube video of these steps by clicking here
Name the instance Tractivity (default is SQLExpress and you can name whatever you prefer)
Be sure to choose Mixed Mode Authentication
Set the sa password to Tr@c1234 or another password of your choice, be sure you write this down. You will use this password again when setting up the iTrac web service
Enable services to automatic
Complete the installation
1.Run SQL Server Configuration Manager.
2.Go to SQL Server Network Configuration > Protocols for YOUR_INSTANCE_NAME.
3.Make sure TCP/IP and VIA is enabled.
4.Right-click on TCP/IP and select Properties.
5.Verify that, under IP2, the IP Address is set to the computer’s IP address on the local subnet.
6.Scroll down to IPAll.
7.Make sure that TCP Dynamic Ports is blank.
8.Make sure that TCP Port is set to 1433.
View a YouTube video of these steps by clicking here
The server firewall needs to allow ports 1433,1434 for access to the SQL Express database
The server firewall must also allow port 7373 to support iTrac data capture cell phone and tablet devices.
Determine the server local IP address:
This is the local server IP address that the router will forward to
Log into the Internet router and set up port forwarding for port 7373 from all addresses.
The actual process steps for setting up a port forwarding on your router will vary from router to router. You may need to consult with your router documentation for information on how to configure a port forwarding
You may want to create an external DNS to allow intranet and internet traffic the ability to reach the server using the same web address.
We recommend using a DNS service such as no-ip.org (available as a free service) for this purpose. The DNS service will use an address such as mycompany.hopto.org to resolve to your ISP IP address. If you have a dynamic IP address, you can download a program named DUC from the no-ip.org site and run it on your server to keep your address updated every 5 seconds.
If iTrac devices will only be used within the wireless network (never used outside the building) then the DNS service is not required and you may use the service local IP address as the web address.
Download http://support.tractivity.com/download/iTracWF.exe
You will need your login and password to gain access to this file
The database path needs to be set in the application settings.
Open the application settings feature
Add a new setting
Name: DataSource Value: ServerName\TRACTIVITY
Add a new setting
Name: UserID Value: sa
Add a new setting
Name: Password Value: Tr@c1234 (or whatever your password was set to)
Add a new setting
Name: Catalog Value: Timeport
Add a new setting
Name: dbType Value: SQL
Save and close
This “test” can only be completed after employees have been added to the database.
You will need to install TracManager on server (if not already done)
Download the TracManager installation file from the Tractivity support website.
You will need to use the login and password credentials you received with your license certificate. Save the installation file to a shared location that can be accessed from other computers on the network.
View a YouTube video of these steps by clicking here
Be sure the application pool is running and the web site is running. If not, start them.
Click on the iTracWeb site
Click the Browse *:7373 Action
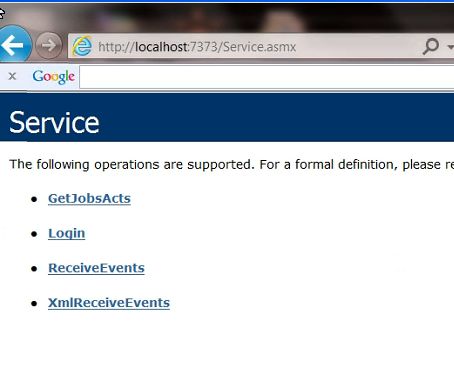
Click on Login and try a user name and password.
If EmpID is not zero – success.
Be sure the router is forwarding port 7373 to the computer
For trouble-shooting help click here
Copyright TRACTIVITY 2016. All Rights Reserved